What's Latest and Fresh in?
Programmers

Friday 14 April 2017

Download Adobe Photoshop CC full version highly compressed x32 and x64 bit

Adobe Photoshop is a raster graphics editor developed and published by Adobe Systems for Windows and OS X.

Photoshop CC 2014 (15.0) was released on 18 June 2014. As the next major version after CS6, it is only available as part of a Creative Cloud subscription, the full version of which costs $49 every month. But are giving it to you for Free. Major features in this version include All-new Smart Sharpen, Intelligent Upsampling, and Camera Shake Reduction for reducing blur caused by camera shake. Editable Rounded Rectangles and an update to Adobe Camera Raw (8.0) were also included.

CC 2014 features improvements to content-aware tools, two new blur tools (spin blur and path blur) and a new focus mask feature that enables the user to select parts of an image based on whether they are in focus or not. Other minor improvements have been made, including speed increases for certain tasks.

Download

Sunday 29 January 2017

HTML 5 Course


           HTML5 is a core technology markup language of the Internet used for structuring and presenting content for the World Wide Web. As of October 2014 [update] this is the final and complete fifth revision of the HTML standard of the World Wide Web Consortium (W3C).

In this Course, You will learn about the basics of HTML5 and also learn about creating your own websites with HTML5

"Click on any of the Lessons and it will open a new window of the Tutorial"

  1. Introduction and Getting Started
  2. Elements and Tags
  3. Create your First Website
  4. A few more Elements
  5. Attributes and Links
  6. Images and Tables
  7. Layout (CSS) and Uploading Pages
  8. Web Standards and Validations
  9. A Review to Everything you have Learned
  10. The Final Tips

PHP is a server-side scripting language created in 1995 and designed for web development but also used as a general-purpose programming language.

In this Course, You will learn PHP Language and after completing the course, you will be able to professionally make your own websites with PHP.


"Click on any of the Lessons and it will open a new window of the Tutorial"


  1. What is PHP?
  2. Servers
  3. Your First PHP Page
  4. Working with Time and Date
  5. Loops
  6. Conditions
  7. Comment Your Scripts
  8. Arrays


"Stay Updated for more Lessons" *Course will have 22 Lessons.

Introduction to PHP (New Course)

Introduction

PHP gives you the freedom to add advanced features to your website.
The aim of this tutorial is to give you an easy, yet thorough and accurate introduction to PHP. It starts from scratch but requires that you already have a good knowledge of HTML. If you are new to HTML, you should start with our HTML Course.
PHP can be used in many contexts - discussion forums, polls, shops, SMS gateways, mailing lists, etc. The only limitation with what you choose to do with PHP is your imagination. PHP is not hard to learn, but be aware that PHP is more sophisticated and demanding to learn than HTML. Therefore, patience in the process is a virtue.
This tutorial cannot show you everything. Therefore, some engagement and a will to experiment are required.

What is needed?

It is assumed that you already have a text editor and know how it is used.
Next, you need access to a computer or a server that can run PHP. In contrast to HTML and CSS, PHP is not affected by which browser your visitors use, but by the type of server that's hosting your pages. This is because PHP is a server-side technology.
In the next few lessons, you will learn all about how PHP works, and how to set up your computer to run PHP. After that, you'll learn about specific functions and methods.
When you finish this tutorial, you will be able to code PHP and thus have access to unlimited possibilities for adding interactivity to your webpages.
Enjoy!

Arrays - PHP Tutorial 8

Arrays

In this lesson, we will look at what an array is, how it is used, and what it can do.
Understanding arrays can be a little difficult in the beginning. But give it a try anyway... we've tried to make it as easy as possible.

What is an array?

An array is a set of indexed elements where each has its own, unique identification number.
Sound confusing? It's actually not that complicated.
Imagine a list of words separated by commas. It is called a comma-separated list, and it could, for example, look like this:

 apples, pears, bananas, oranges, lemons
 
 
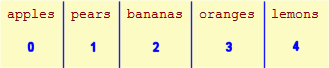
Then try to imagine dividing the list at each comma. Next, give each section a unique identification number like this:

apples (0), pears (1), bananas (2), oranges (3), lemons (4)
What you see is an array. We can, for example, name the array "fruits". The idea is that we can access the array with a number and get a value back, like this:
fruits(0) = apples
fruits(1) = pears
fruits(2) = bananas
fruits(3) = oranges
fruits(4) = lemons
This is the idea behind arrays. Let us try to use it in practice.

How do you use an array?

We will continue with the fruit example. Step by step, we will make it work as a real array. First, we set a variable equal to the list of fruits:

 <?php

 $fruitlist = "apples, pears, bananas, oranges, lemons";
 
 ?>
 
 
Next, we use the function documentationexplode to split the list at each comma:

 <?php
  
 $fruitlist = "apples, pears, bananas, oranges, lemons";
  
 $arrFruits = explode(",", $fruitlist);

 ?>
 
 
Voila! "$arrFruits" is now an array!
Notice that we called the function documentationexplode with two arguments:
  1. the list that should be split
  2. and the delimiter - i.e., the character used to split (in this case a comma) - in quotation marks: ",".
Here we use a comma as a delimiter, but you can use any character or word as a delimiter.
Let us try to comment the script and put it into a PHP page:

 <html>
 <head>
 <title>Array</title>
 </head>
 <body>

 <?php
 
 // Comma separated list
 $fruitlist = "apples, pears, bananas, oranges, lemons";
  
 // Create an array by splitting the list (with comma as delimiter)
 $arrFruits = explode(",", $fruitlist);
  
    // Write the values from our array
    echo "<p>The list of fruits:</p>";
  
    echo "<ul>";
    echo "<li>" . $arrFruits[0] . "</li>";
    echo "<li>" . $arrFruits[1] . "</li>";
    echo "<li>" . $arrFruits[2] . "</li>";
    echo "<li>" . $arrFruits[3] . "</li>";
    echo "<li>" . $arrFruits[4] . "</li>";
    echo "</ul>";

 ?>

 </body>
 </html>
 
 
This example is very simple, and it might be a bit difficult to see the advantage of using an array for this particular task. But just wait... arrays can be used for many very useful things.

Loop through an array

Back in lesson 5 you learned about loops. Now we will look at how you can loop through an array.
When you know how many elements an array contains, it is not a problem defining the loop. You simply start with 0 and let the loop continue to the number of items available. In the example with the fruits, you would loop through the array like this:

 <html>
 <head>
 <title>Array</title>

 </head>
 <body>

 <?php
 
 // Comma separated list
 $fruitlist = "apples, pears, bananas, oranges, lemons";
  
 // Create an array by splitting the list (with a comma as delimiter)
 $arrFruits = explode (",", $fruitlist);
  
    echo "<p>The list of fruits:</p>";
    echo "<ul>";
  
    // Loop through the array $arrFruits
    for ($x=0; $x<=4; $x++) {
       echo "<li>" . $arrFruits[$x] . "</li>";
    }
  
    echo "</ul>";

 ?>
  
 </body>
 </html>
 
 
As you can see, the variable $x (which increases from 0 to 4 in the loop) was used to call the array.

How to find the size of an array

But what if we add another fruit to the list? Then our array will contain one element more - which will get the identification number 5. Do you see the problem? Then we need to change the loop, so it runs from 0 to 5, or else not all of the elements will be included.
Wouldn't it be nice if we automatically could find out how many elements an array contains?
That's exactly what we can do with the function documentationforeach. Now we can make a loop that works regardless of the number of elements:

 <?php
    foreach ($arrFruits as $x) {
       echo $x;
    }
 ?>
 
 
This loop will work regardless of how many or few elements the array contains.

Another example

Below is another example of how you can use an array to write the name of the month:

 <html>
 <head>
 <title>Array</title>

 </head>
 <body>
 
 <?php
 // Creates array with each month.
 // Creates array with the months. Note the comma before January - because there is no month with the number 0
 $arrMonths = array("","January","February","March","April","May","June","July","August","September","October","November","December");
  
 // Call the array with the number of the month - write to the client
 echo $arrMonths[date("n")];
 ?>

 </body>
 </html>


Notice that we use the function documentationarray instead of the function documentationexplode to create an array.
Ok. Enough about arrays! In the next lesson, you'll learn how to write your own functions.

Comment Your Scripts - PHP Tutorial 7


As you may have noticed, PHP scripts can easily look confusing. In this lesson, we will cover why comments are important and how to insert them into your scripts.

Why is it important to comment your scripts?

When you are coding, you are writing commands to a server/computer and need to use a highly formal language that may not clearly reflect your thoughts when making the script.
Therefore, it can be difficult for others (or yourself) to understand how the script is structured, and thus hard to identify and correct errors in the script.
Comments can be used to write short explanatory text in the script. The server completely ignores the comments, and the comments do not affect the actual functionality of the script.
In the business world, it is often a requirement that scripts and programming are commented, otherwise it would be too risky for a company to take over a system in which it would be too difficult to find and correct errors.

How do you insert comments?

It is quite easy to insert a comment. You simply start the comment with a double slash: "//".
Take a look at this example from lesson 5, now with comments:

 <html>
 <head>
 <title>Loops</title>
 </head>
 <body>

 <?php

 // Here we write color codes using three loops

 // Red can be between 0 and 255 
 for ($intRed=0; $intRed<=255; $intRed=$intRed+30) {

    // Green can be between 0 and 255
    for ($intGreen=0; $ intGreen<=255; $intGreen=$intGreen+30) {

       // Blue can be between 0 and 255
       for ($ intBlue=0; $intBlue<=255; $intBlue=$intBlue+30) {

       // The color code is made on the form rgb(red,green,blue)
    $strColor = "rgb(" . $intRed . "," . $intGreen . "," . $intBlue . ")"

       // Now we write the color code to the client
    echo "<span style='color:" . $strColor . "'> " . $strColor . " </span>";

       // Closes the loops
       }
    }
 }

 ?>
 
 
For the sake of the example, we have included many extra comments, so it should be clear that you are far better off debugging a script with comments than without.
Therefore, remember to comment your scripts!
In the Next Lesson, you will learn what an array is, how it is used, and what it can do.

Conditions - PHP Tutorial 6

Conditions

Conditions are used to execute part of a script only if some predefined requirements (conditions) are fulfilled. For example, a condition could be that a date must be after January 1, 2015 or that a variable is greater than 7.

If...

The first type of condition we will look at is documentationif, which has the following syntax:

 if (condition) {
    statement
 }
 
 
Again, the syntax is very close to ordinary English: If a condition is met, then execute something. Let's look at a simple example:

 <html>

 <head>
 <title>Loops </title>
 </head>
 <body>

 <?php

 $x = 2;

 if ($x > 1) {
    echo "<p>variable $x is greater than 1 </p>";
 }
  
 ?>

 </body>
 </html>


if ... else ...

The next type of condition will want to look at is documentationelse , which may be presented in the following form:

 
 if (condition) {
    statement
 }
 else {
    statement
 }

 
Again, the syntax is very close to ordinary English: if a condition is met execute something or else execute something else.
In lesson 4, you learned how to find the number of a month. In the following example, we will use the month number in an if or else condition to find out what season it is:

 <html>
 <head>
 <title>Conditions</title>
 </head>
 <body>

 <?php

 if (date ("m") == 3) {
    echo "<p>Now it's hot summer!</p> ";
 }
 else {
    echo "<p>I do not know what season it is!</p> "; 
 }

 ?>

 </body>
 </html>
 
 
As you can see, this condition is not a particularly smart condition - it only works when it's June!
However, there are plenty of ways to improve the condition and make it more precise. Below are listed comparison operators that can be used in the condition:
== Equals
< Less than
> Greater than
<= Less than or equal to
>= Greater than or equal to
!= Not equal to
In addition, there are some logical operators:
&& And
|| Or
! Not

The operators can be used to develop more precise conditions, so now we can expand the above example to include all the summer months:

 <html>
 <head>
 <title>Conditions</title>

 </head>
 <body>

 <?php
 
 if (date("m") >= 6 && date("m") <= 8) {
    echo "<p> Now it's summer!</p> ";
 }
 else {
    echo "<p> Now it's either winter, spring or autumn!</p> ";
 }
  
 ?>

 </body>
 </html>


Let's take a closer look at the extended condition:

 date("m") >= 6 && date("m") <= 8
 
The condition can be translated into:

 If the month is greater than or equal to 6,
 and the month is less than or equal to 8
 
 
Smart, eh? Operators play a significant role in many different parts of PHP.
But it still only works with June and July. All other months are not yet covered by the condition. So let's try to develop the condition a little more.

if ... elseif ... else...

Using documentationelseif, we can expand the condition and make it work for all months:

 <html>
 <head>
 <title>Conditions</title>

 </head>
 <body>

 <?php
 
 if (date("m") >= 3 && date("m") <= 5) {
    echo "<p>Now it's spring!</p>";
 }

 elseif (date("m") >= 6 && date("m") <= 8) {
    echo "<p>Now it's summer!</p>";
 }

 elseif (date("m") >= 9 && date("m") <= 11) {
    echo "<p>Now it's autumn!</p>";
 }

 else {
    echo "<p>Now is winter!</p>";
 }
  
 ?>

 </body>
 </html>


To write conditions is all about thinking logically and being methodical. The example above is pretty straightforward, but conditions can get very complex.

switch ... case

Another way of writing conditions is to use the documentationswitch method:

 switch (expression) {
 
 case 1: 
    statement
    break; 
 case 2: 
    statement
    break; 
 default:
    statement
    break;
 }
 
 
This method is based on an expression and then lists different "answers" or "values" with related statements. The easiest way to explain the method is to show an example.
As you may remember from lesson 4, the function documentationdate("w") returns the current weekday. This can be used in an example where we write the name of the day (instead of a number):

 <html>
 <head>
 <title>Conditions</title>
 </head>
 <body>

 <?php
 
 switch(date("w")) {
  
 case 1:
    echo "Now it's Monday";
    break;
 case 2:
    echo "Now it's Tuesday";
    break;
 case 3:
    echo "Now it's Wednesday";
    break;
 case 4:
    echo "Now it's Thursday";
    break;
 case 5:
    echo "Now it's Friday";
    break;
 case 6:
    echo "Now it's Saturday";
    break;
 default:
    echo "Now it's Sunday";
    break;
  
 }
  
 ?>

 </body>
 </html>
 
 
Often switch can be a good alternative to if or else conditions. What you should use in a given situation depends on which method you find easiest and most logical. Making your scripts logical and clear can be a great challenge.
In the next lesson, we will look at how you can add comments to your scripts to explain how they work. Good comments can be crucial if you or somebody else has to make changes in your codes at a later stage.

Loops - PHP Tutorial 5

Loops

In PHP, it is possible to manage the execution of scripts with different control structures. In this lesson, we will look at loops. Loops can be used to repeat parts of a script a specified number of times or until a certain condition is met.

"while" loops

The syntax for a documentationwhile loop is:

 while (condition) {
  Statement
 } 
 
 
The syntax can almost be directly translated into English: do something while a condition is met.

Let's look at a simple example:

 <html>
 <head>
 <title>Loops</title>

 </head>
 <body>

 <?php

 $x = 1;
  
 while ($x <= 50) {
    echo "<p>This text is repeated 50 times</p>";
    $x = $x + 1;
 }
 ?>

 </body>

 </html>
 
 
In the example, a variable named "$x" is used. As you can see, variables in PHP always start with a "$" character. It's easy to forget this at first, but it's absolutely necessary to remember or else the script doesn't work.
Apart from that, the example is almost self-explanatory. First the variable $x is set to be equal to 1. Then the loop asks the server to repeat the text while $x is less or equal to 50. In each loop, the variable $x will be increased by 1.

"for" loops

Another way to make a loop is with documentationfor on the form:

 
 for (Initialization; Condition; Step) {
   Statement
 }
 
 
The statement is repeated as long as 'Initialization' + 'Step' meets the 'Condition'. If that doesn't make sense, look at this example:

 <html>
 <head>

 <title>Loops</title>
 </head>
 <body>

 <?php

 for ($x=0; $x<=50; $x=$x+5) {
    echo '<p>variable $x is now = ' . $x . '</p>';
 }
 ?>

 </body>
 </html>
 
 
In the example above, $x is growing with the value 5 in each loop. The loop will continue as long as $x is below or equals 50. Also note how the value $x is used as part of the sentence.

Here is another example:

 <html>
 <head>

 <title>Loops</title>
 </head>
 <body>

 <?php

 for ($x=1; $x<=6; $x=$x+1) {
    echo "<h" . $x . ">Heading level " . $x . "</h" . $x . ">";
 }
 ?>

 </body>
 </html>
 
 
Do you get it? First we set the value of $x to 1. Then in each loop, we write a heading at level $x (h1, h2, h3, etc.) until $x is equal to six.

Loops within loops

In principle, there are no limitations on how loops can be used. For instance, you can easily put loops inside loops and thereby create many repeats.
But be careful! PHP becomes slower the more complicated and extensive the scripts. For instance, look at the next example where, with three loops, we can write over 16 million colors!
In order not to make the page slow, we have drastically reduced the number by putting the step to 30 and thereby limited the number of colors to 512.

 <html>

 <head>
 <title>Loops </title>
 </head>
 <body>

 <?php
 
 for ($intRed=0; $intRed<=255; $intRed=$intRed+30) {

    for ($intGreen=0; $intGreen<=255; $intGreen=$intGreen+30) {

       for ($intBlue=0; $intBlue<=255; $intBlue=$intBlue+30) {
  
    $StrColor = "rgb(" . $intRed . "," . $intGreen . "," . $intBlue . ")";
    
    echo "<span style='color:" . $StrColor . "'>" . $StrColor . "</span>";
  
       }
    }
 }
 ?>

 </body>
 </html>
 
 
In this example, each of three primary colors (red, green and blue) can have a value between 0 and 255. Any combination of the three colors creates a color on the form rgb(255,255,255). The color code is used as color in a <span>.

Loops becomes more useful when you've learned a little more. When you understand the principle in a loop, you can proceed to the next lesson, where we will look at conditions.

© 2013 Programmers. All rights resevered. Designed by Templateism